Making Print Ready Files
To make sure the printing process moves smoothly and stays within budget, you need to create a print-ready file. "Print-ready" files are files that are 100% ready for high-resolution printing. A file that is print-ready will not require any alterations or enhancements for us to create your signs, documents, and other marketing collateral. When we have to work on the files to make them print-ready or ask you to do it, your print job takes longer and could cost more.
BUT, if you follow these simple tips, resulting prints will look professional and high-quality and your job will be ready on time.
Use CMYK color scheme
Set up your document for printing with a CMYK color scheme (Cyan, Magenta, Yellow, and Black). If your need to have the exact right colors, you can choose Pantone® colors to get it right.
Please, avoid using the RGB color scheme. Every screen displays color differently and is a close, but not accurate, display of how the color will print.
Use a .25 inch margin
When possible, leave about .25" between your text or other important content and the edge of your document so it isn’t trimmed away. This doesn’t include the background.
Use a resolution of 300dpi
Please, start your project with a resolution of 300dpi. Often times the default resolution is only 72 dpi. This is not acceptable for printing. The image will look fine on screen, but print out grainy.
NOTE: A file that is 72dpi can be increase to 300dpi easily. However, this is a mistake. By increase a file size, you are not increasing the image resolution or adding more detail to the image.
Check the document size
The document size should to match the final printing size. Please, use inches for your dimensions.
The convention is width measurement first, height measurement second. So, 8.5 x 11 (a standard US page size) measures the width first - 8.5 - and then the height -11. Or more commenly known as portrait. Alternatively, 11 x 8.5 stil measures the width first - 11 - and then the height - 8.5. Known as landscape.
Check Image Sizes
Images need to be 100% or less. Anything above 110% will not print the way you expect and look grainy.
Save and send us your document as PDF
Best option is to save your project as a PDF using these setting:
Adobe PDF Preset: PDF/x-a:2001
Marks and Bleeds: Crop Marks (see below for more information)
Registration Marks On
Another common option is to save the InDesign file by packaging it. Also, include a PDF to show us what you want the final printed piece to look like.
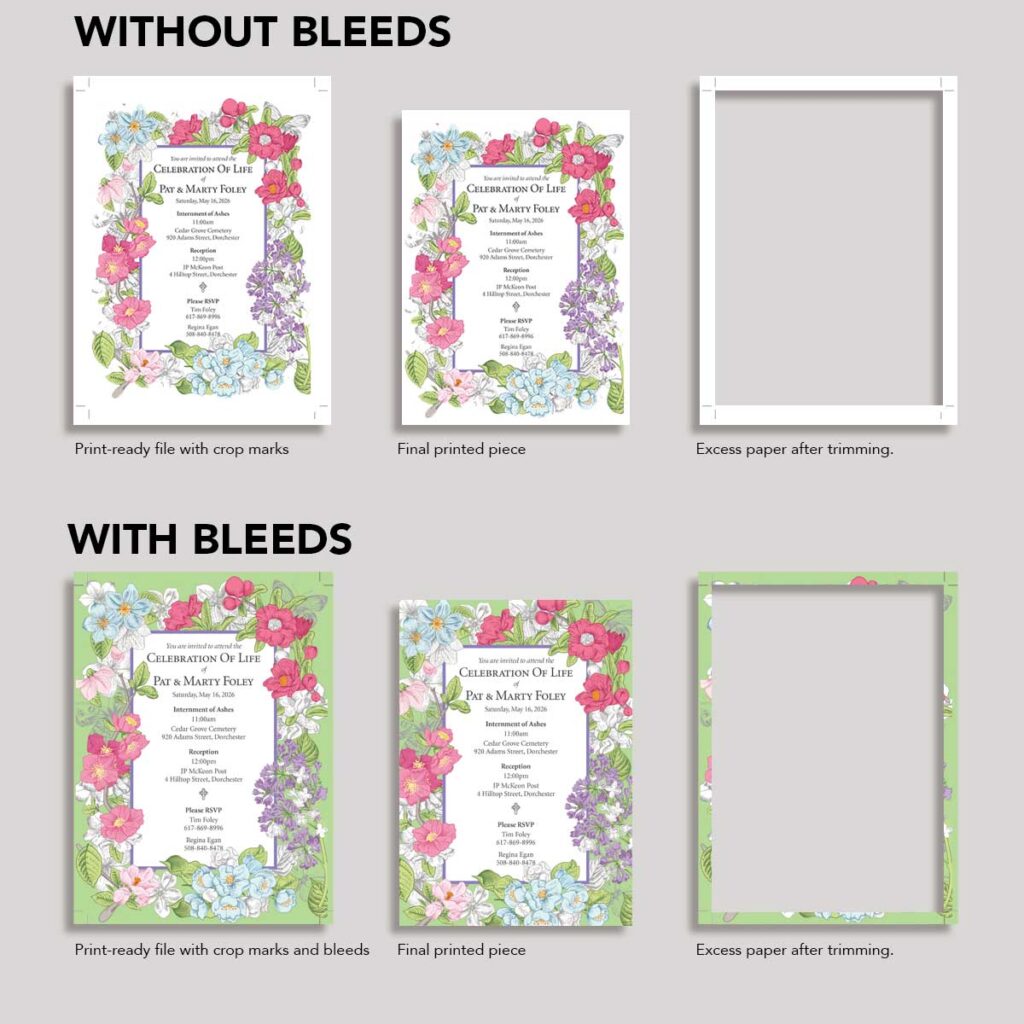
Add crop marks and or bleeds
Crop marks: thin, lines printed at the corners of a document to indicate where to cut or trim the paper to its final size. They should be added on all documents.
Bleeds: an industry term that refers to extending your design 1/8" (0.125”) past the trim or outline of your printable area. If the paper shifts during printing, having extra artwork will prevent unprinted edges. Thus, the “bleed zone” is a buffer that ensures your design prints to the edge of the document. Anything past the crop marks won't be printed, that it's only there as a precaution.